A day in Kubernetes
kubernetes hackdayRecentely I was asked if I had any experience in Kubernetes: well, long story short, I don’t :)
But it poked my interest a bit, so I decided to give it a try and see what I can learn about it in a short time. It’s a rainy Sunday, so it seems like a perfect day to concentrate and take a deep dive on the topic. Ideally I’d want to be able to deploy a couple of services in Kubernetes and have them communicate with each other.
What is Kubernetes?
According to their official documentation
Kubernetes is a portable, extensible, open source platform for managing containerized workloads and services, that facilitates both declarative configuration and automation.
That’s a nice definition, but I believe I need to dig deeper to really understanding. Having a look at the documentation Kubernetes seems humongous! Let’s try to focus on the bare minimum we’ll need to deploy an application: let’s start by having a look at what a Pod is
Pods
Quoting from https://kubernetes.io/docs/concepts/overview/
Pods are the smallest deployable units of computing that you can create and manage in Kubernetes. A Pod (as in a pod of whales or pea pod) is a group of one or more containers, with shared storage and network resources, and a specification for how to run the containers.
For me, coming from the ECS world, this really resembles what a Task is. Okay, so what we’ll probably do is we’re going to deploy instances of our application as Pods. But there must be a way to group multiple Pods/instances of our app under a common umbrella.
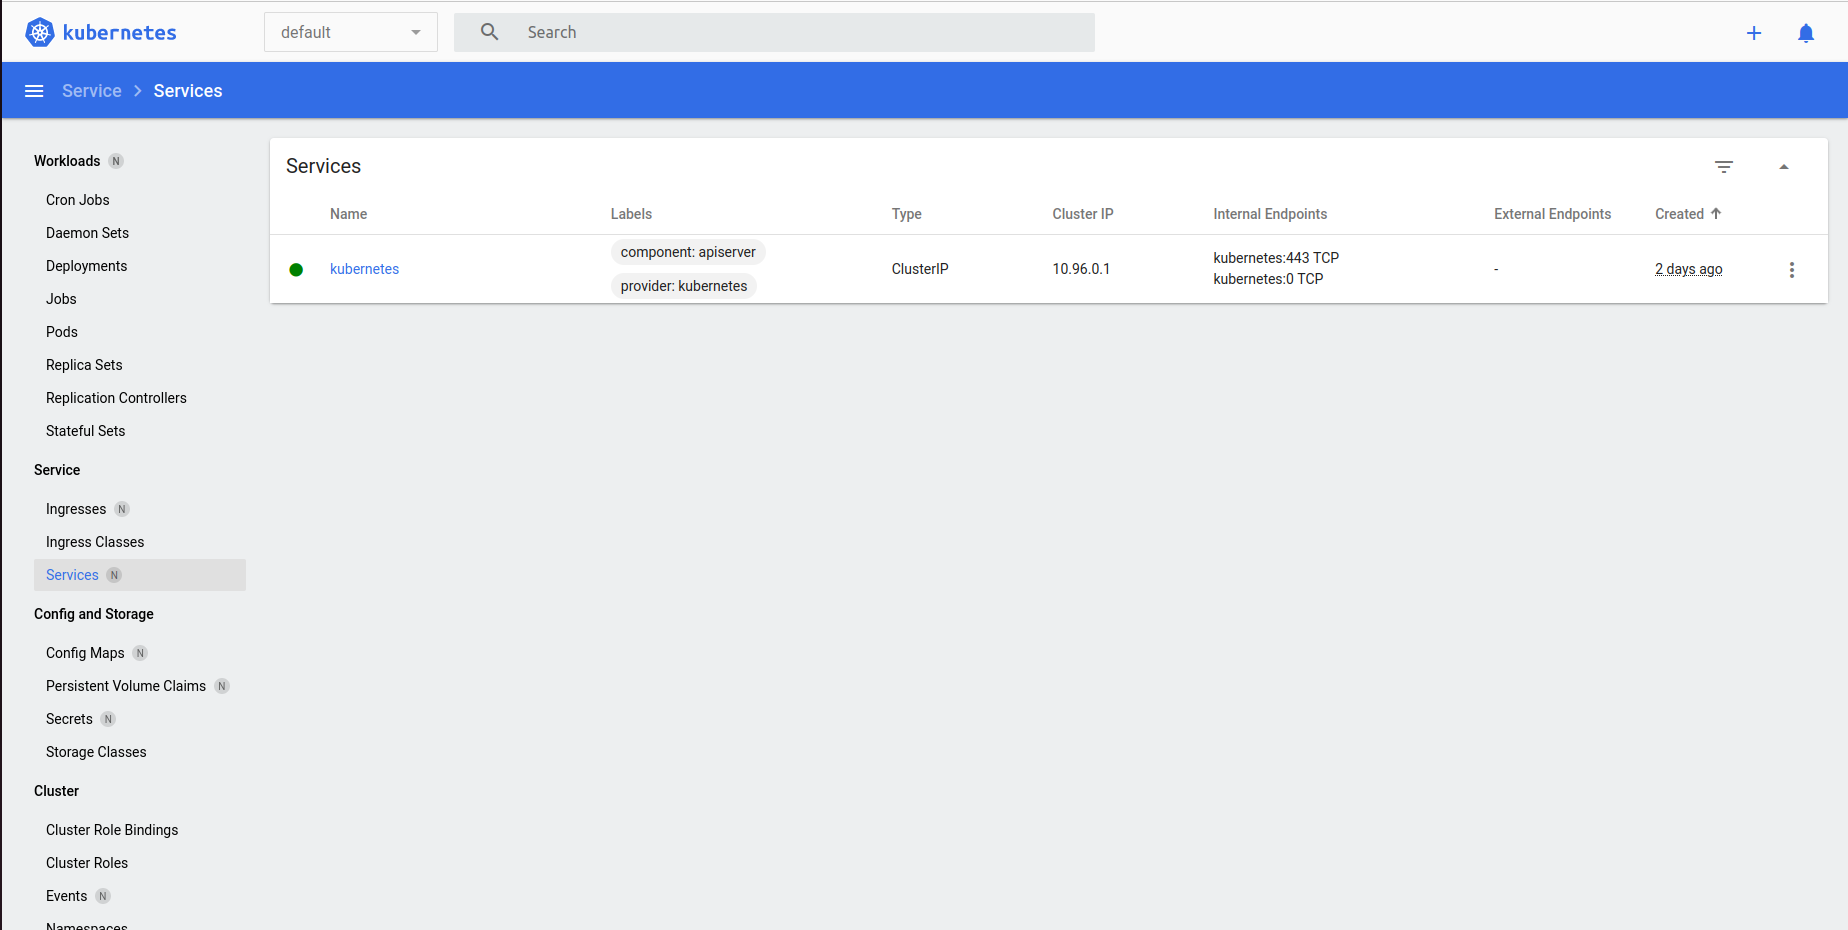
Services
Quoting from https://kubernetes.io/docs/concepts/services-networking/service/
An abstract way to expose an application running on a set of Pods as a network service. With Kubernetes you don’t need to modify your application to use an unfamiliar service discovery mechanism. Kubernetes gives Pods their own IP addresses and a single DNS name for a set of Pods, and can load-balance across them.
Nice, this is what I was expecting to find! It even comes with Load Balancing out of the box, sweet.
So we’ll want to deploy an application as one or more Pods, and expose it via a Service. I think we have enough to start and finish in one day. So let’s get to work
Running Kubernetes locally
Well, one sure thing about Kubernetes is that it’s BIG. It was not designed to run locally on a consumer machine, but luckily there are well supported flavours of Kubernetes that can be run locally, like minikube for instance. So let’s follow the installation instructions and try to run it with minikube start command. And I got the first error, not off to a sparkling start :sweat-smile:
Exiting due to
RSRC_DOCKER_STORAGE: Docker is out of disk space! (/var is at 99% of capacity). You can pass ‘–force’ to skip this check.
If I were running on Windows or MacOS, I could give the linux VM that is spinned up by Docker more memory from the Docker Desktop configuration: unfortunately I’m running on Linux, so this error just means I have some cleanup to do. After removing stale docker resources witht the docker system prune command, I was finally able to start minikube :tada:!
With the command minikube dashboard I’m able to see a nice dashboard displaying the cluster current state: this is going to be very useful to exepriment a bit.
My application
SpringBoot is a framework I grew familiar with, so I chose it to create this sample Hello, world! application that exposes a few simple endpoints returning static text. Have a look if you fancy, but I want to focus more on deploying this to Kubernetes rather than the app itself.
Creating my first deployment
Now I have a running local Kubernetes cluster, and a Docker image: time to deploy! Kubernetes takes a declarative approach to deployments. This means that you can focus on declaring the desired state rather than imperatively enumerate all the instructions yourself.
I created the following deployement descriptor:
apiVersion: apps/v1

kind: Deployment

metadata:
  name: kubernetes-demo-deployment
  labels:
    app: kubernetes-demo

spec:
  replicas: 2
  selector:
    matchLabels:
      app: kubernetes-demo
  template:
    metadata:
      labels:
        app: kubernetes-demo
    spec:
      containers:
        - name: kubernetes-demo
          image: stefanoboriero/kubernetes-demo
          ports:
            - name: kubernetes-demo
              containerPort: 8080
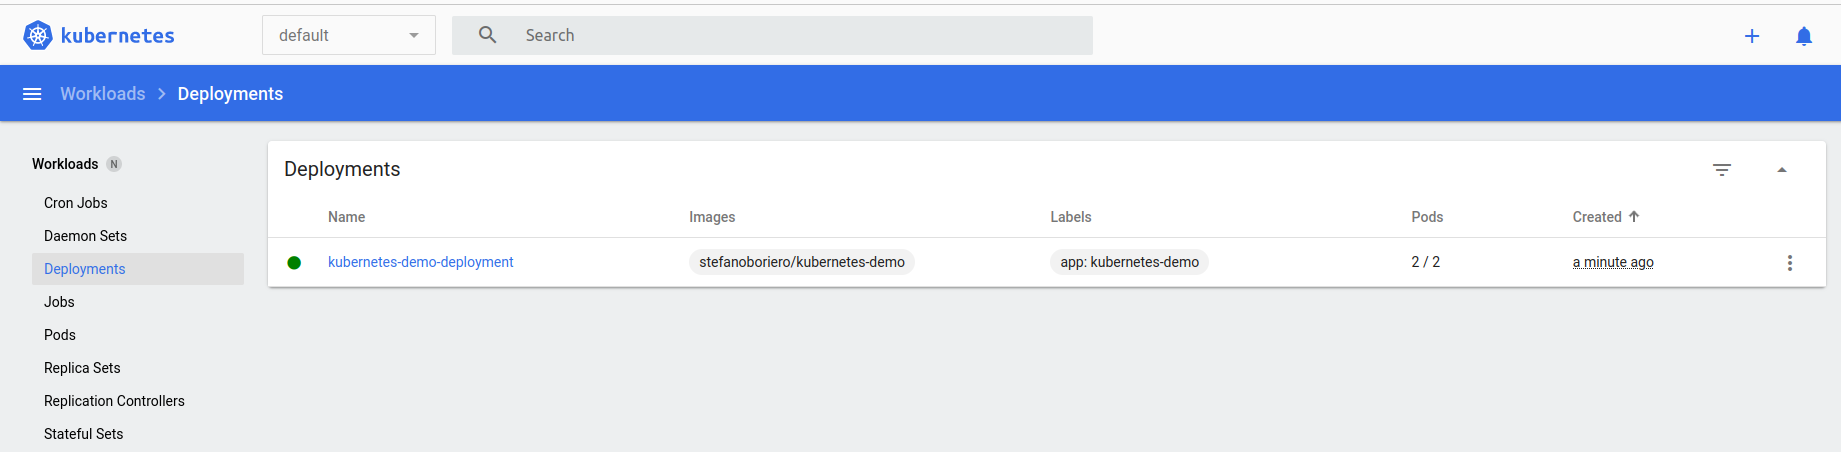
This means that I want 2 Pods (replicas: 2) and each Pod is just one container running the stefanoboriero/kubernetes-demo image, with a named port opened at 8080. Pretty simple. Let’s apply this with the command minikube kubectl -- apply -f kubernetes/deployment.yml and see what happens.
deployment.apps/kubernetes-demo-deployment created
Sweet! If I have a look at the minikube dashboard, I can see both the deployment and the 2 Pods running. Great, but now how can I make requests to the application?
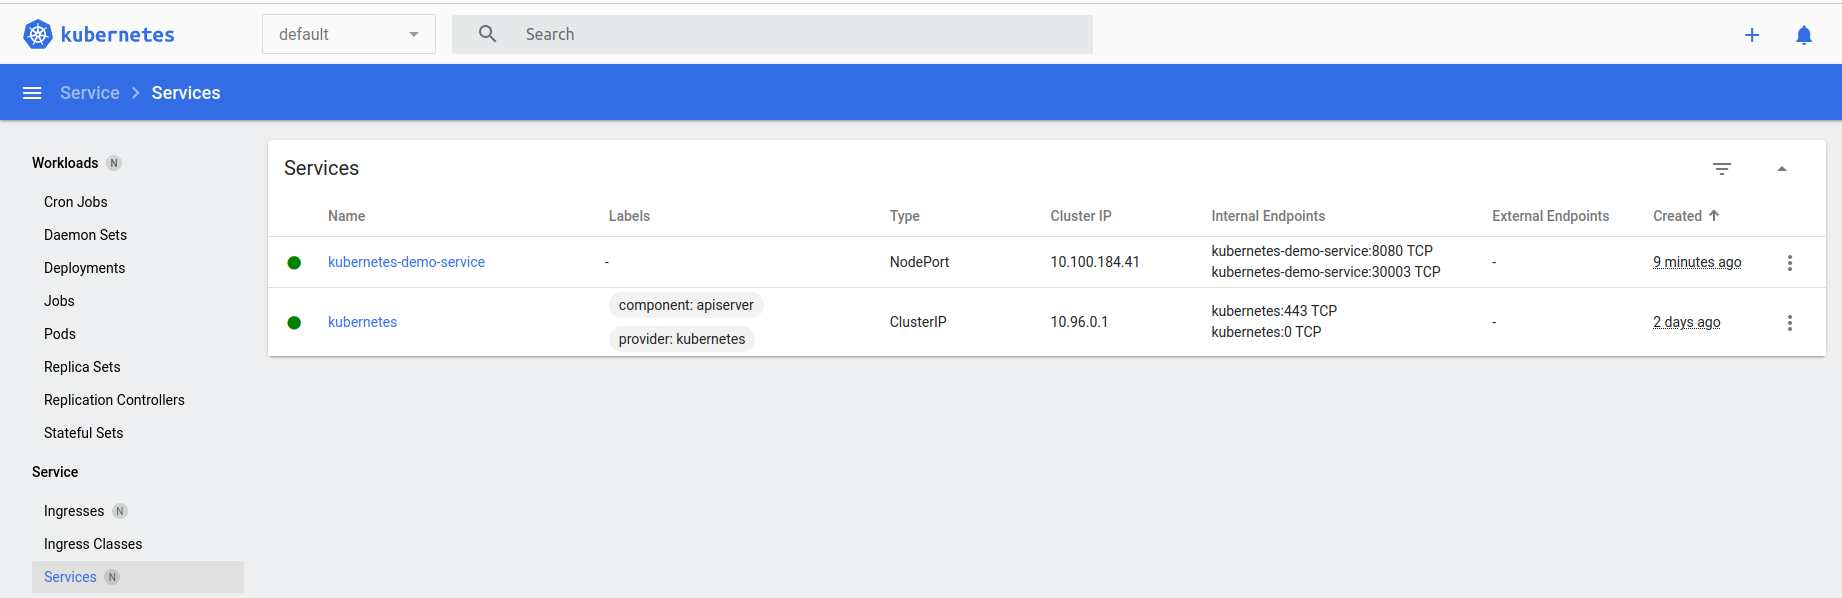
Creating my first Service
Services are what I’m looking for. There are different service types but the most appropriate for my local experiment is NodePort type.
I created the following Service definition:
apiVersion: v1
kind: Service
metadata:
  name: kubernetes-demo-service
spec:
  type: NodePort
  selector:
    app: kubernetes-demo
  ports:
    - protocol: TCP
      port: 8080
      targetPort: 8080
      nodePort: 30003
      name: http
  clusterIP: 10.100.184.41
The selector object defines what Pods are part of this service: it’s handy that I don’t have to specify their Ips or anything, so even if I add or remove Pods when the app scales up or down, the selector will just pick them up. I specified both port and targetPort because, remember, this acts also as a LoadBalancer: so the port field is the port where the LoadBalancer is listening, and targetPort is the port of the Pod behind it. In this case they’re both 8080 and I could have omitted the targetPort because the same value is used by default, but I wanted to be as explicit as possible. nodePort is the port on the Kubernetes node that is accessible from outside the cluster, I hardcoded it for predictability and replicability of the example. Finally, clusterIP is the IP that is reacheable only from inside the Kubernetes cluster.
Let’s run minikube kubectl -- apply -f kubernetes/service.yml and apply this
service/kubernetes-demo-service created
And I can see the service in the minikube dashboard as well!
Accessing the application
My application is now accessible at http://192.168.49.2:30003/hello!
There are a few other endpoints just to test out few different ways to connect between services in the cluster:
- http://192.168.49.2:30003/forwardUsingExternalisedService will get the response contacting a second service using its externalised ip.
- http://192.168.49.2:30003/forwardUsingClusterIp will get the response contacting a second service using its internal clusterIP.
- http://192.168.49.2:30003/forwardUsingServiceName will get the response contacting a second service using its service name, letting Kubernetes resolve the actual service ip.
If I’m running another instance of my application oustide Kubernetes, then only the first will work.
That’s great! I achieved what I was looking forward to.
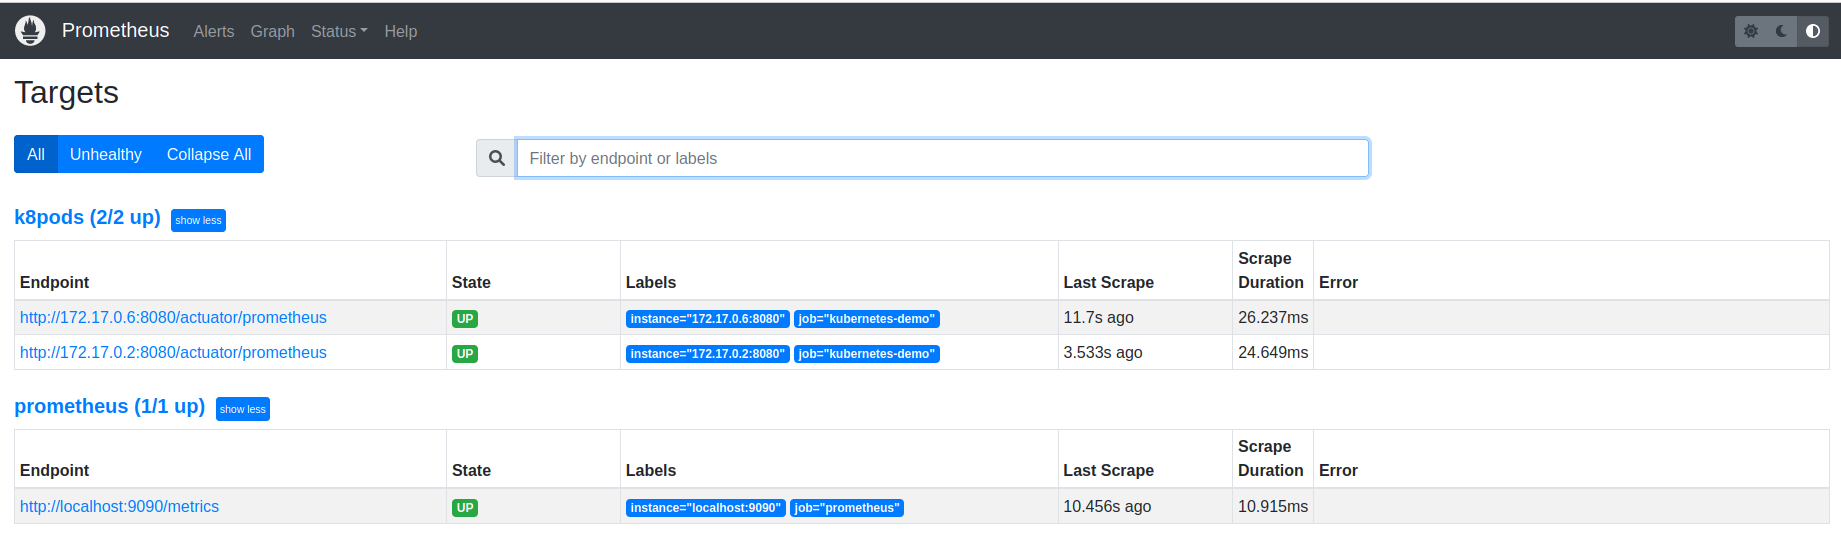
Bonus part: scraping my Pods with Prometheus
Knowing how important Observability is even in early stages of development, I additionally tried to deploy a Prometheus instance that would scrape my Pods following these instructions. That gave me the possibility of seeing few other bits of Kubernetes in action, like ClusterRoles, ServiceAccounts and ConfigMap. And there you can see my Pods being scraped!
Running out of disk space
After that, my laptop ran out of disk space :sweat-smile: so I started getting all sorts of errors like
E1212 02:57:43.099164 426734 root.go:80] failed to log command start to audit: unable to write to audit log: write /home/stefano/.minikube/logs/audit.json: no space left on device
So it was time to turn off the laptop :)
Conclusion
I liked it! I think Kubernetes does a good job at easing the deployment of containerised services with its declarative approach. I also like the way the networking is taken care of, being able to resolve service names via the internal DNS makes it possible to randomise IP address at will. And it has so many more features that I didn’t had the chanche to explore!
Follow up
When I’ll have some more time I’d like to take a look at how services can be horizontally scaled, and how the LoadBalancing can be configured. Ingress is another crucial component I didn’t have the time to play with.